Introduction
Students
We have tried to make this feature as easy as possible for you. After all, you have a carnival to organize!
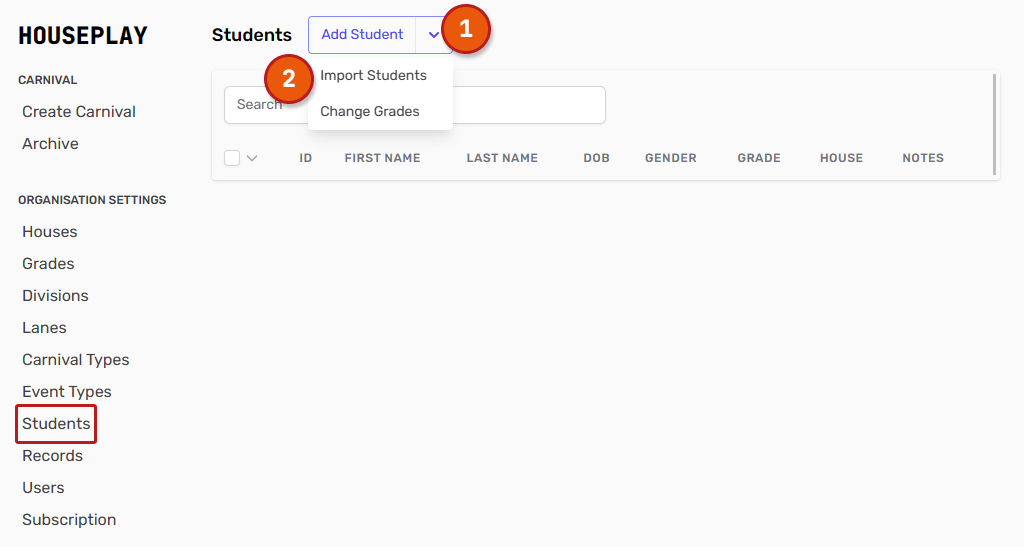
To input your students, begin by navigating the 'Students' page under 'Organisation Settings' in the left hand menu.
Then you can choose from the two ways to input students:
Add Student - Add a student record manually. This is a good option when you just want to add a small number of students.
Import Students - Using an Excel CSV file in import in one batch. You'll want to use this option when adding a large number of students. (Select this option from the drop-down menu).
 Manually adding students
Selecting 'Add Student' will take you to a new page where you can input the student information manually.
The list below will give you some pointers for each field:
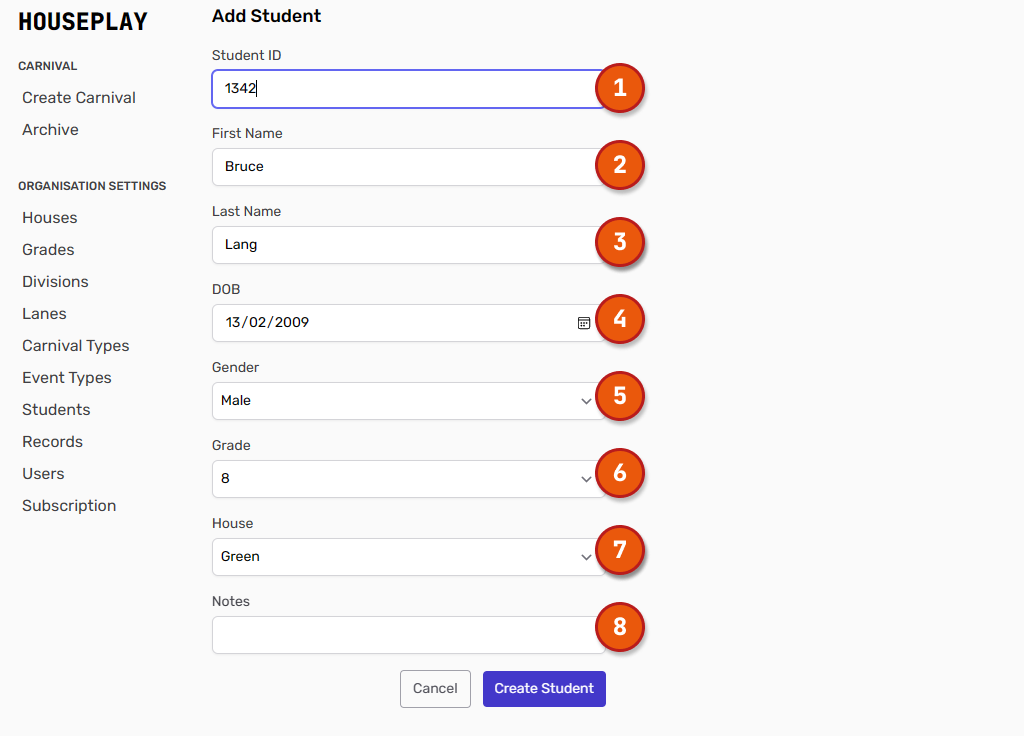
Student ID - This is a free-text field. If you do not have a specific ID number attached to this student, you can leave this blank. (This is an optional field)
First Name - Enter the first name of the student. (This is a required field)
Last Name - Enter the surname of the student. (This is a required field)
DOB - You can either enter the date of birth manually following the required format, or you can use the date picker. (This is an optional field)
Gender - Select 'Male' or 'Female' from the drop down menu. (This is a required field)
Grade - Select the grade from the drop down menu. The grades that will appear here are the ones that you set up earlier. If you need to add additional grades you can go back to the 'Grades' page and add them. (This is a required field)
House - Select the correct house from the drop down menu. The houses that will appear here are the ones that you set up earlier. If you need to add additional grades you can go back to the 'Houses' page and add them. (This is a required field)
Notes - This is a free-text field where you can add any information pertinent to the student. (This is an optional field.)
Once you have completed these fields, hit the 'Create Student' button at the bottom of the page. Keep repeating these steps until you have added all the students.
Importing students
The 'Import Students' function allows you to bulk import students using a Excel CSV file. Let's focus on the CSV file for a moment.
Student CSV File Setup
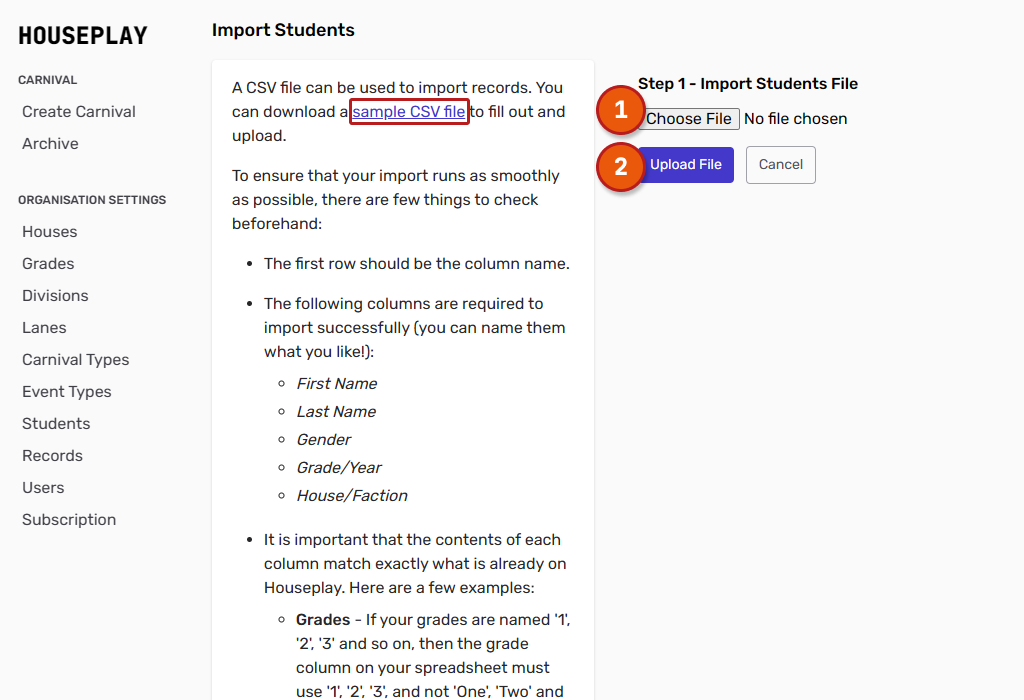
You may have your own CSV file, if not, we've provided a template that you can download on the 'Import Students' page. You can also download a copy right here!
There are a few things to make sure of with your CSV file to ensure a smooth import:
The first row (row 1) of your CSV file should be the name of the column (eg. student id, first name, last name etc).
The following columns are required to import successfully, they form a minimum data set for each student record:
First Name
Last Name
Gender
Grade/Year
House/Faction
(Note: these column names are just examples, but you can name the columns whatever you like!)
It is important that the contents of each column matches exactly what is already on Houseplay. Here are a few examples:
Grades - If your grades are named '1', '2', '3' and so on, then the grade column on your spreadsheet must use '1', '2', '3', and not 'One', 'Two' and 'Three'.
Houses - If the house names you set up in your organization begin with a capital letter, then the house names in your spreadsheet should also begin with a capital letter.
Gender – ensure this field begins with a capital letter – ‘Male’ or ‘Female’
There is the option of including additional fields:
DOB - date of birth, the format must be year-month-day (eg. 2010-09-27)
Notes - free text notes which can be used for any information
A couple of pointers:
If you need to adjust a lot of information in your CSV file, use the 'Find and Replace' (ctrl+F) feature in Excel.
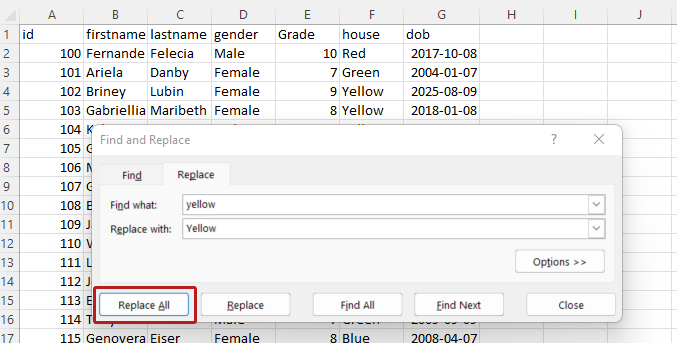
Save, save, save! Don't forget to save your CSV file before attempting to upload it to Houseplay. That way it will pick up any changes you have made.
CSV File Import
Once you are confident you have done your best to set up the CSV file, you can give the import a whirl by following these steps:
Select the 'Choose File' button, then select the CSV file from wherever it is saved.
Select the 'Upload File' button.
This will take you to the next screen - mapping fields.

Mapping Fields
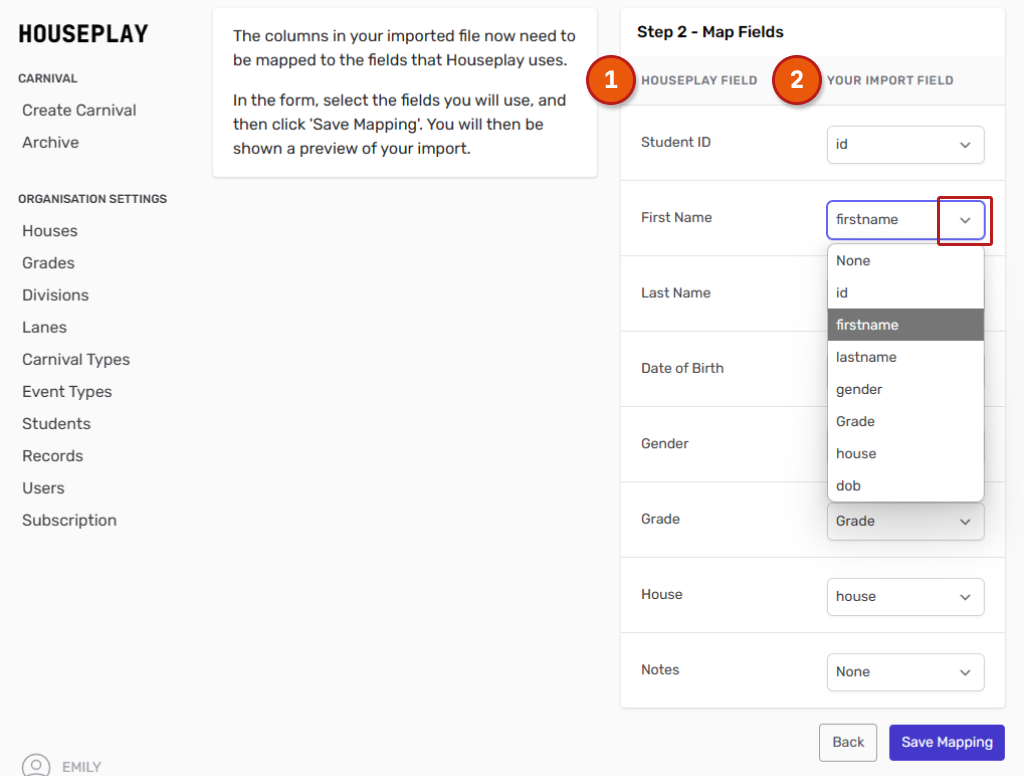
To make sure that the information goes to the right place, let's match the Houseplay fields (1) with your import fields (2).
To do this, simply hit the drop down arrow on each field and select the corresponding option.
Once you have done this, hit the 'Save Mapping' button. This will take you to the next screen - import preview.
 Import Preview
On this page you have the chance to preview your information before you complete the import. Scroll down the list and check to see if all records were imported correctly - errors will be marked in red.
Depending on whether you are happy with the preview, you can choose from the following options:
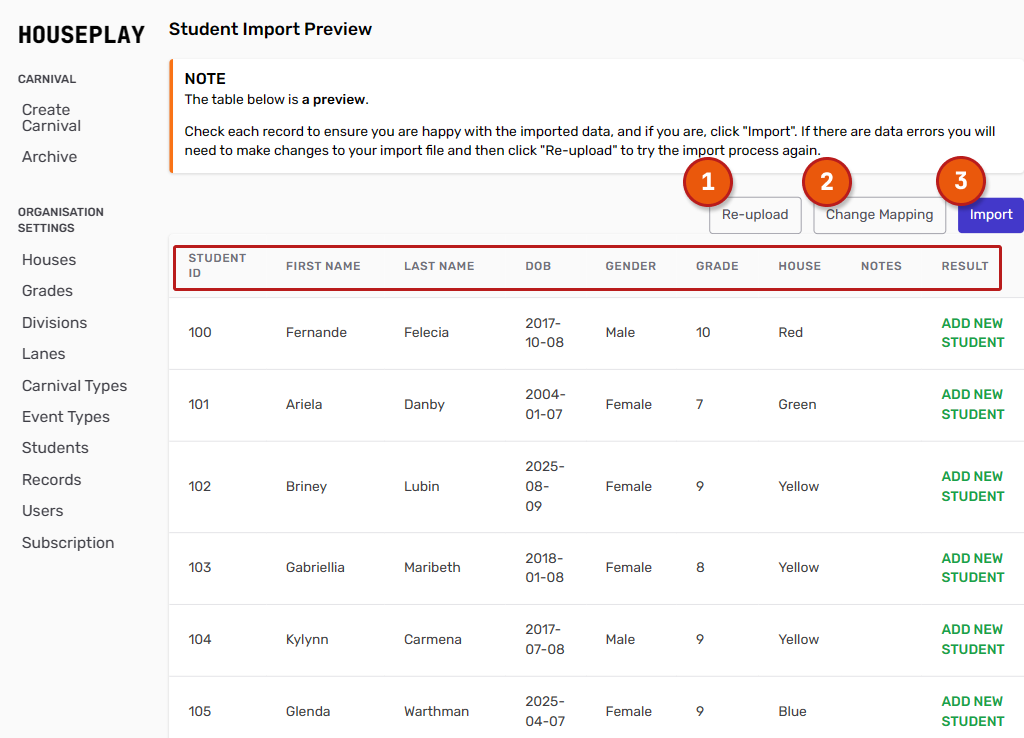
Re-upload - Allows you to go back, adjust your CSV file, then re-upload.
Change Mapping - Go back one step and adjust the mapping.
Import - If you are happy with the mapping (information matches the column headings in the red box), you can go ahead and complete the import.
Congratulations! Now that you have uploaded your students, lets move onto carnival types.
Adjusting students
Adjusting a student after you have added them is very simple. Start by navigating to the 'Students' page under 'Organisational Settings' in the left hand navigation menu, then click 'Edit' to the right of the students name (1):
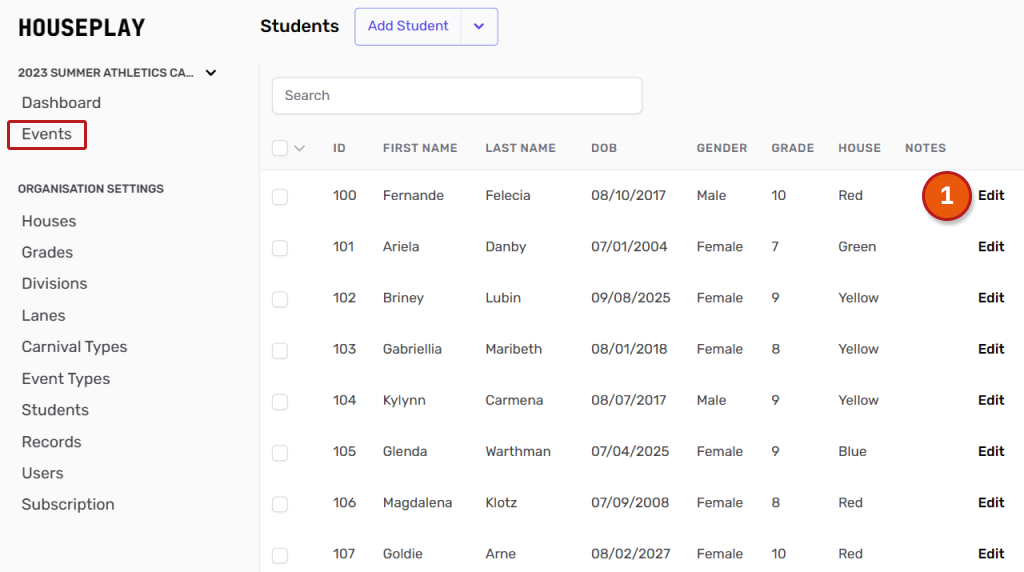 This will take you to a new screen, the 'Edit Student' page. Adjust whichever field are needed, then click the 'Update Student' button. The record will now be saved.
Adjusting student grades
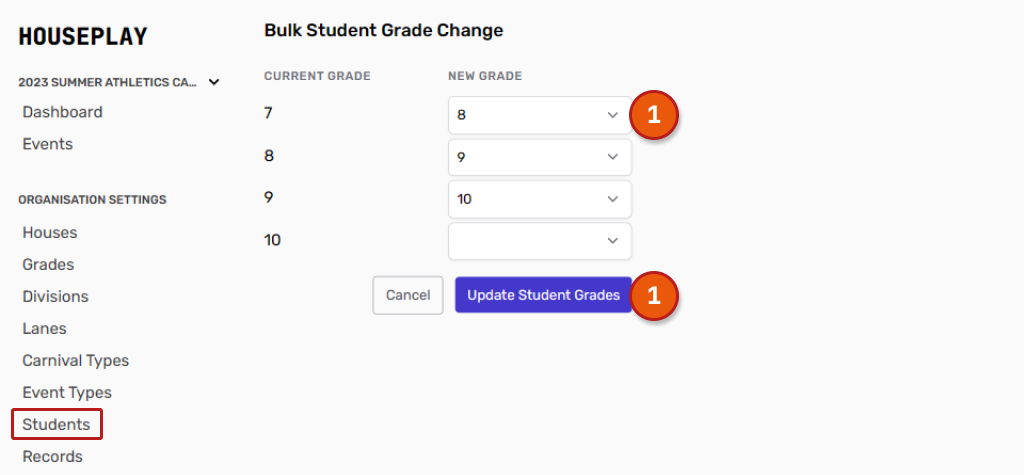
Each year, you may need to adjust the students grades to the next grade up. We don't want you to have to go through hundreds of records manually (ain't nobody got time for that!) so we have built a feature that allows you to do it in a few click! It is called Bulk Grade Change.
Start by navigating to the 'Students' page under 'Organisational Settings' in the left hand navigation menu. Then select 'Change Grades' from the drop down menu (1).
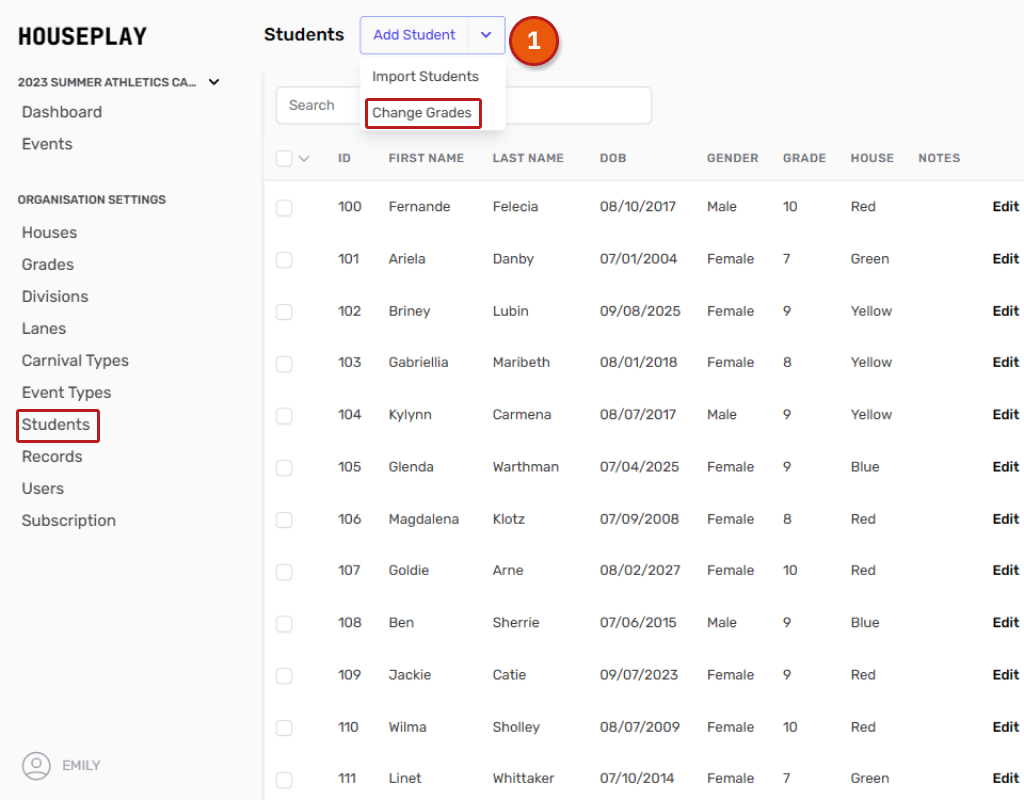 This will take you to a new page. The 'Bulk Student Grade Change' page. From here it is pretty straight forward:
Select the new grade from the drop down menu.
When you are finished selecting the new grades, click the 'Update Student Grades' button to save changes.
